GTD with Outlook 2010 and OneNote 2010 – Collection
May 27, 2010
by Michael Wheatfill
Table of Contents: GTD with Outlook 2010 and OneNote 2010
In Part 3 of the GTD with Outlook 2010 and OneNote 2010 Series, we setup OneNote to work with GTD. Now that we have Outlook and OneNote setup, we can begin using our GTD system. With GTD, the very first thing we must be able to do is capture and record all of our inputs. We’ll eventually process these inputs and decide what to do with them, but for now we’ll focus on making sure we understand the tools and features that allow us to capture all the information that we come across each and every day.
A brief note on Outlook as a GTD capture device
I don’t really look at Outlook as a capture device per say. As it pertains to collecting our stuff, Outlook is simply a bucket, or an Inbox for gathering our email. It plays a much larger role in other steps in the GTD process, but not for capturing.
What it is good at is corralling our email. All my email gets sent straight to my Inbox for processing later. Since that’s about all it does in the collection process, we’ll spend the majority of our time focusing on OneNote and how it can help us capture and collect all of our “digital stuff.”
Without further ado…
The single greatest life altering OneNote feature ever
Ok, maybe I’m exaggerating a bit. But seriously, if you aren’t using this feature today, you’ll want to after seeing just how cool it is. I’m talking about the Docked OneNote feature. What it does is dock OneNote to the right side of your screen along side other applications such as web browsers, Word, PowerPoint, etc. You can take notes while still being able to view the content in the other applications. And best of all, OneNote automatically creates hyperlinks that point back to the web page or application you were viewing at the time. Let’s give it a try.
In OneNote 2010, click the Dock to Desktop button in the Quick Access toolbar in the top left corner. You can also use the shortcut Ctrl + Alt + D.
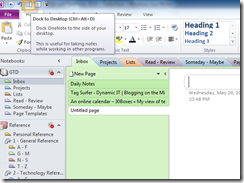
OneNote docks itself to the right hand side of your screen in a narrow format. The rest of your application windows automatically adjust in size, and text in the Docked OneNote window automatically wraps so you don’t have to scroll side to side. Want to stop taking linked notes and return to good ‘ol regular OneNote? No problem, just click the Dock to Desktop button again or push Ctrl + Alt + D to restore OneNote to the normal view.
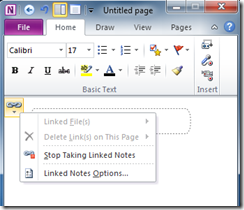
But we don’t want to stop now do we? Let’s try taking some notes…but not just any notes. Linked Notes! Linked Notes is the feature that enables us to take notes that link back to the content we are viewing in our applications. You’ll want to make sure Linked Notes are enabled by clicking the Linked Notes icon in the left corner of the OneNote content area. You can enable Linked Notes by selecting Start Taking Linked Notes or disable Linked Notes by selecting Stop Taking Linked Notes. You can enable and disable any time you like while OneNote is docked.
Since you are already in a web browser if you are reading this, place your cursor in the OneNote window to start typing. Here I’ve taken some notes on a forum I visited. Simply by having the web browser page active and typing notes in OneNote, I’ve created a reference back to the website I was viewing. Hover over the text in OneNote which will show an icon of the application the notes are linking to. Click the icon to be taken to the web page.
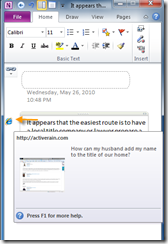
Cool, huh? Now try this with another application such as Word or PowerPoint. Clicking the linked note should take you to the exact page or PowerPoint slide you were viewing when you typed the note.
Tip! There’s a Linked Notes in OneNote button on the Review tab of the ribbon in Word, PowerPoint and Internet Explorer which gives you another option to start taking Linked Notes.
Note on Application Compatibility: Linked Notes do not work with every application. You’ll know that it works when a small icon appears to the left of your note. If you try taking linked notes in Outlook, Excel or Adobe Reader for instance, no icon will appear, signifying that these applications aren’t supported for taking linked notes.
Now, if you want to pass this linked note on to a friend in an email, it doesn’t appear to be that easy to extract the hyperlink out, but it quite simple in fact. Right click the link icon for the note, and select Copy Link. You can paste this into an email now that it is available as a URL.
Capturing Everything
Docked OneNote and Linked Notes are awesome, however there are a plethora of ways to capture information with OneNote. We’ll cover many of these ways and how they can help us corral our digital “stuff”.
Make sure you have OneNote setup to send all of your “stuff” to your Inbox section. That way we can work on capturing things at light speed instead of being caught up in the act of processing and organizing everything we capture. Visit Part 3 of the GTD with Outlook 2010 and OneNote 2010 Series if you need help setting up OneNote for our GTD system.
From Outlook
Meeting Details – Capture meeting notes with context, without leaving OneNote!
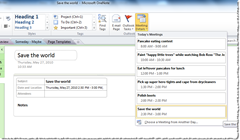
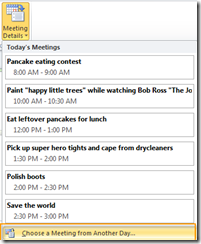
In OneNote, create a new page in your inbox, then click Meeting Details in the Outlook section of the Home ribbon. Choose a meeting for the current day.
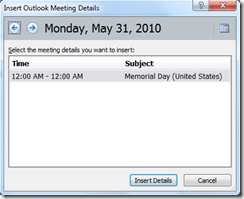
Or choose a meeting from another day by selecting Choose a Meeting from Another Day… and selecting the day and meeting of your choice. Click Insert Details to insert the meeting into OneNote.
Sending to OneNote – Take notes, keep as reference, and bring the attachments over too!
In Outlook, select an email to view in the reading pane, or open an email in a separate window. Go to the Move section of the Home tab (or the Message tab if you have the message open in a separate window) and select the Send to OneNote button. The message magically appears in your OneNote Inbox section.

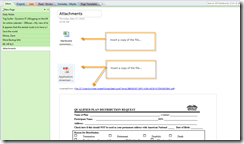
Now try it with a message that has an attachment. You guessed it, the attachment comes along with it and can now be opened from OneNote.
Want just the attachment from the message? We can do that too! Right click the attachment and choose Copy or select the attachment and press Ctrl + C. Then step over to OneNote, select the page you want to paste the attachment to, and select the Paste button from the Home tab on the ribbon or press Ctrl + V.
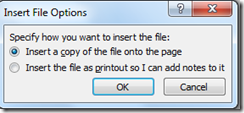
You can either choose to copy the file onto the page, which will display an icon that you can double-click to open, or you can insert the file as a printout so you can notate it directly within OneNote. Cool!
Linked Notes from Outlook – Linking is the bees knees!
Remember our Linked Notes topic from above? Well we aren’t done with Linked Notes quite yet. We can also send Calendar items, Contacts and Tasks to OneNote and the OneNote pages will automatically link back to the Outlook item we sent to OneNote. Let’s see how it works.
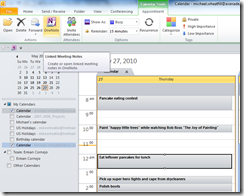
In Outlook, select a Contact, select a Task (either from the Tasks screens or the To Do bar) or select a Calendar item (either from the Calendar screen or the To Do bar) and then click the Linked Notes button in the Actions section of the ribbon (If it’s a calendar item, the button is on the Appointment tab of the ribbon).
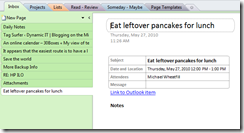
Back in OneNote, we see that a new page has been created in our Inbox. This page has a hyperlink called Link to OneNote item. Click this hyperlink to open the Outlook item you originally sent to OneNote.
From Internet Explorer
Send to OneNote
Ever want to capture an entire webpage in all it’s glory so you can take notes, reference or read it offline? All you have to do is click the Send to OneNote button and the web page will be sent to a new OneNote page in your Inbox. Now, you may be wondering…where the heck is this button anyway? By default in IE 8, it’s usually hidden because it’s an extra icon that just won’t fit on the toolbar. Access it by clicking on the fly out arrow to the right.

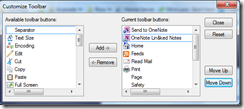
Feel like this is too hard to get to? You have a couple of options. You can either unlock the toolbars and drag out the toolbar to include these icons, which will give less room to your tabs….
Right click on the toolbars, choose Lock the Toolbars (which deselects the option and really unlocks them). Then grab the handle for the Toolbar and drag it to the left until the OneNote icons appear. Then right click and choose Lock the Toolbars.

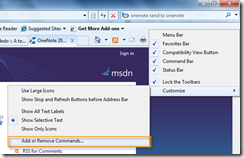
You also have the option of customizing the toolbar and moving the OneNote buttons up in the order, so they appear first. Right-click the toolbar and choose Customize –> Add or Remove Commands… Then select the OneNote buttons and click the Move Up button until they are in a position of your choice. Click Close to finish.
Copy and Paste – Old and Faithful!
Yep, we can still copy and paste text, pictures and hyperlinks from IE. Give it a try and you’ll notice that at the bottom of the pasted information you’ll see a hyperlink reference back to the page you copied the information from. It’s very useful if you want to copy an excerpt or certain element from a page, but would still like to know where it originated from.

All the other stuff
Screen clippings
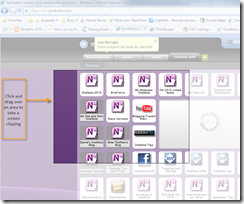
Hit the Windows + S keys to take a screen clipping of anything on your screen. This will automatically get sent to a new page in your Inbox section. Just make sure your OneNote icon is in the tray or the Windows + S key combo won’t work!
Print to OneNote
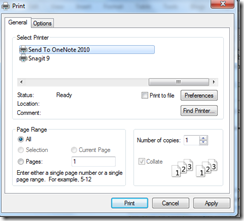
Any application that has print capabilities can print right into OneNote. Try it out. Open up a PDF in Adobe Reader as an example. Go to Print your PDF document, and instead of printing to your normal printer, select the Send to OneNote 2010 printer. You can print all the pages or just a range of pages and these will be sent directly to your Inbox section in OneNote. Neato!
Scan to OneNote
Yes, you can scan too! Click the Insert tab on the ribbon and select the Scanner Printout button. If you have a scanner connected, your scanning software will launch and allow you to scan directly into OneNote.
![]()
Record Audio
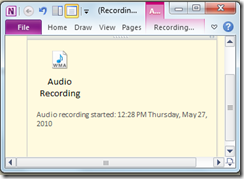
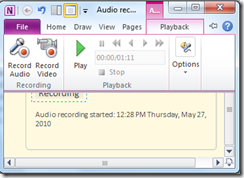
Too lazy to type or want to record some audio? It’s easy to capture audio directly to OneNote. Head over to the Insert tab on the ribbon and click Record Audio which will begin recording right away in the page you have selected, or right click your OneNote icon and choose Start Recording Audio. This will pop up a side note and place the audio on a new page within your OneNote Inbox section. You can pause or stop your recordings, and play them back when they are finished. Best of all, you can take notes on them!
![]()
![]()
Attach Files and File Printouts
You can attach files and file printouts which we briefly covered in the Outlook section earlier in this post. Attaching files is often useful when we want to take some notes on the file, but don’t want to embed them within the file, or remember where the file is in our file system.
Go to the Insert tab on the ribbon and choose Attach File. Browse and select the file you want to attach and select Insert. Or better yet, simply drag and drop the file into OneNote from Windows Explorer!

You can also attach a file printout from within OneNote. On the Insert tab, choose File Printout. Browse and select the file you want to insert as a printout and it will be inserted into OneNote. It looks sort of like one long image, but the cool thing about it is that the text within the printout is fully searchable within OneNote. Super sweet!
Insert Pictures
Of course you can insert pictures! There’s a few ways of doing it. You can copy and paste from a web browser, you can drag and drop the picture file as shown above in the “Attach Files and File Printouts” section, or you can click the Picture button on the Insert tab and select your picture, then click Open.
Collecting your thoughts
In closing, I hope this post shows you some of the many ways we can capture information and bring it into OneNote. The idea is that we spend less time worrying about how to capture the information, less time about what exactly we do with that information, and more time on simply capturing and collecting all the stuff that is important or of interest to us.
Coming up…
In our next post in the series, we’ll cover how to process all of the information we gather throughout the day.
Thank you for reading and please feel free to post your comments or thoughts. They are much appreciated!
by Michael Wheatfill
Table of Contents: GTD with Outlook 2010 and OneNote 2010
In Part 2 of the GTD with Outlook 2010 and OneNote 2010 Series, I covered how to setup Outlook 2010 for the GTD system. OneNote 2010 is going to be our central hub for collecting and organizing our information. Here’s how to setup OneNote.
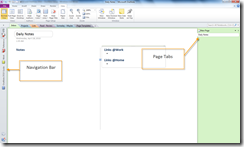
By default our OneNote layout looks as such. As you can see, the Navigation bar is collapsed on the left, and the page tabs are on the right.
Our GTD system will work best with a more fluid layout. We’re going to expand our Navigation bar so we can more easily navigate our notebooks, and we’ll move the page tabs over to the left so our all of our navigation is in one place. We don’t have to move the mouse to opposite ends of the landscape as we navigate through OneNote.
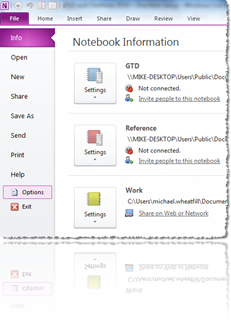
Click the purple File tab at the top left corner to open the Office Backstage view. Select Options.
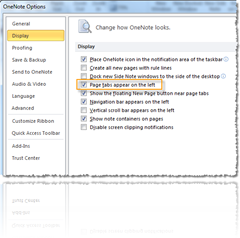
Next, click the Display tab and select the Page tabs appear on the left checkbox. Click OK.
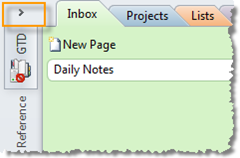
Finally, click the right arrow on the Navigation Bar to expand the Navigation area to show Notebooks, sections and pages.
Set up your notebooks
How you setup your GTD system is purely subjective and will differ by individual. I’ve tweaked my OneNote setup little by little to come up with what I have today, and this works for me. I’ll detail how and why I organize mine the way I do which at the very least will give you some idea as to the organizational flexibility of OneNote. My setup works for me for one reason alone. I TRUST IT. I trust it because it’s simple for me to understand, and therefore, it’s easy for me to use. Don’t be afraid to refine OneNote here and there until you can fully trust and use your system.
I start off by creating two separate notebooks (Go to File –> New to create a notebook). I name these notebooks:
- GTD – A notebook for capturing, and referencing all my lists (projects, read/review, someday/maybe, etc.)
- Reference – A notebook to organize all my reference material
GTD Notebook
In my GTD notebook, I create the following sections:
![]()
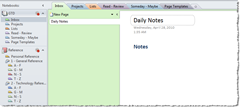
- Inbox – A section devoted to capturing information. I capture mounds of information daily without worrying about organizing it while capturing. Everything goes to the inbox. A single page or multiple pages, doesn’t matter. Same concept as a physical inbox, an email inbox, and of course, it’s a capture device.
- Projects – A section where I keep all my projects. Project Support Material (PSM) goes here as well, and I’ll explain later how I organize this.
- Lists – A section for me to keep lists that I review regularly. This could be an ad-hoc list or something I review daily. For example, I have a weekly review checklist of everything I need to process, and I have a goals list of my key areas I like to focus on in my personal and professional development.
- Read – Review – Usually weblinks, emails sent from Outlook, or other online material. Perodicals/news clippings generally go in a physical file, and books I want to read go on my someday/maybe lists.
- Someday – Maybe – Someday/Maybe lists and brainstorming for anything I might want to do someday.
- Page Templates – OneNote offers the ability to save layouts of pages for easy creation. I create basic project templates and daily notes templates. I’ll cover how to create these in a bit.
Reference Notebook
In my Reference notebook, I create the following section:
- Personal – This section holds all my personal information like passwords, license keys, employer information, etc. I password protect this section by right clicking the section and choosing Password Protect This Section…
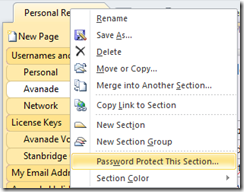
In the Reference notebook, I then create some section groups, and additional sections within those section groups. If you aren’t familiar with section groups, they are basically sections that can hold, or nest other sections. To create a new section group, right click on an empty space in the Section bar and choose New Section Group.

I create the following section groups (bold bullet points) and sections within those section groups (sub-bullet points).
- 1 – General Reference
- A – F
- G – M
- N – S
- T – Z
- 2 – Technology Reference
- A – F
- G – M
- N – S
- T – Z
The General Reference section is for anything that isn’t technology related. Since my major focus at work is technology, and technology happens to be a hobby of mine, I have a separate section for Technology. If you were a graphic designer, you may have a reference section for Graphic Design. Create additional reference sections for reference material that is very focused, or has a large amount of information that may not fit in a general reference.
I also create a separate Work notebook, which is also reference, but contains reference material for each project I work on.
You may be wondering why there are sub-sections in the Reference section groups for A – F, G – M, etc. First, the easiest way for me to file in OneNote is to replicate how I file in my paper-based system. Alphabetically. I also find that it is easier to file and sort in sections that break up my information into more manageable sub-sections. Granted, OneNote makes it very easy to search content across pages, sections and notebooks, but it makes it easier nonetheless.
These sub-sections may not be necessary when the SortPages OneNote PowerToy gets updated for OneNote 2010. Until then it’s a tad difficult to organize pages alphabetically.
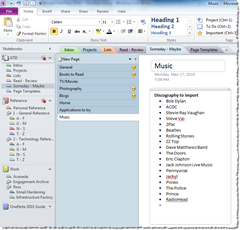
Overall, here’s how the setup looks:
Sending information to your inbox
One of the most powerful features of OneNote is it’s ability to capture information in many different ways. At the most basic level, it’s a text editor. You also have the ability to capture information from Outlook, Internet Explorer, take screen clippings, audio recordings, and that’s just scratching the surface. For more information, see the OneNote 2010 Guide notebook that is created when installing OneNote.
![]()
With the numerous different ways of capturing information, it would be nice if we could dump all this information in our Inbox so we can process and organize it later. Well, we’re in luck because there is indeed a way to do this.
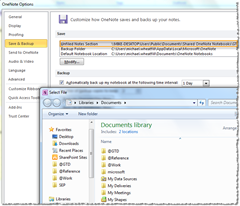
Go to File –> Options. Select Save & Backup. Click the Unfiled Notes Section and select Modify. Navigate to the GTD folder (in Documents\OneNote Notebooks by default) and choose the Inbox.one section. Then click Open.
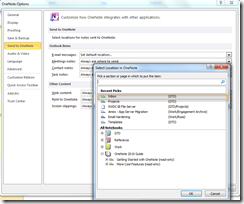
While still in the Options screen, select the Send to OneNote tab. By default, when you send content to OneNote from Outlook, IE or another program, a dialog box will prompt you for a location in OneNote to place the content. Since we are implementing GTD, we are going to make it as easy as possible to capture information, knowing that later we will be processing and organizing it.
For Email messages, select the drop-down menu and choose Set default location… In the dialog box that appears, select Inbox in the GTD Notebook and click OK. Repeat this step for all the remaining items in the Outlook Items area and the Other Content area. Click OK to save the settings.
Setting up page templates
Now we want to setup some page templates so when we are creating new pages to capture our daily notes, or setting up a new project, we save ourselves some time and also implement a bit of structure for our pages.
Page templates are quite easy to create. You will basically create a new page, make some content and format it to your liking, and then save it as a template which can be reused over and over.
First, navigate to the Page Templates section and create a new page. You’ll want to create a framework for your template, and you can use some tools to help you out. New in OneNote 2010 is text styles. These allow you to very quickly create some headings. Type some text, highlight, and the select the style of your choice from the Styles section of the ribbon:
![]()
You can also create lines and shapes to help divide or group the content on your pages. Insert a line or shape by going to the Draw ribbon and selecting from shapes in the Insert Shapes Section.
![]()
I’ve created the following pages. You can use these for ideas, or create your own.
| Daily Notes and Links | Simple Project | Detailed Project |
 |
 |
 |
Once your page is setup how you want it, click the down arrow to the right of the New Page button and select Page Templates…
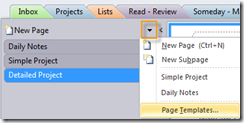
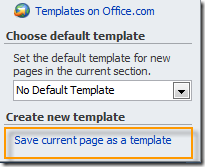
On the Template pane to the right, select Save current page as a template hyperlink at the bottom. In the Save As Template dialog, type a name for the template and click Save.
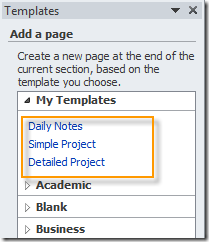
Now when you want to use the newly created template, you can open the Page Templates pane and select your templates from the My Templates section.
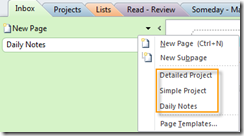
Once you create a page from a template, you should be able to select it from the drop-down menu on the New Page button.
The Closer
That rounds out the setup for OneNote. As you may notice, there isn’t really anything fancy. Tags aren’t used in my system as they are in other GTD systems. I love them and find them very valuable, but haven’t found a need to use them yet.
Stay tuned as we continue on to using our newly setup GTD system based on Outlook 2010 and OneNote 2010. We’ll dig in to how we collect, process and organize all of our information using this software to help implement the GTD methodology. Thanks for reading!
By Michael Wheatfill
Table of Contents: GTD with Outlook 2010 and OneNote 2010
In Part 1 of the GTD with Outlook 2010 and OneNote 2010 Series, I covered the high level overview of my GTD system. This post will focus on getting Outlook 2010 setup appropriately so you can start processing, organizing and doing with Outlook and OneNote.
GTD Next Action Contexts – Using Outlook Categories
The first thing we’ll cover is setting up our Next Action contexts. In the GTD methodology, contexts are used to break up our Next Actions into distinct areas where we actually “do” our Next Actions, such as @Computer, @Home, @Phone, etc. In Outlook, we can use the Categories feature (introduced in Outlook 2007) to break our Next Actions up into these contexts. It’s very easy to customize Categories, and here’s how to do it.
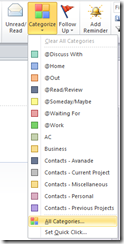
Start by clicking the Categories button in the Tags section of the Outlook ribbon. Select All Categories… from the drop down menu.
Unless you have customized these previously, your Categories will be populated with quite a few pre-created categories. These work for some, but what I end up doing is deleting all of them. Yes, ALL OF THEM. 🙂 But don’t worry, we’ll create our own custom categories and we’ll always have the option of refining these later by creating new categories, modifying them or deleting them.
Here’s what my Categories looks like. You’ll notice I have two distinct groupings; Those that start with the @ symbol and those that start with “Contacts’”. I like to categorize my contacts, and if you do to, feel free to create some Contact categories. However, right now, we are focusing on our Next Action categories, and you guessed it, these start with the @ symbol.
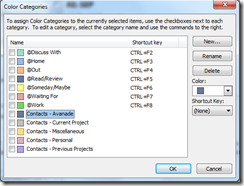
Now, you’ve seen my Categories, and these work for me. One of the great things about GTD is it’s flexibility to fit an individual, and you can create different categories to fit your individual needs. I personally like to keep mine as simple as possible, and I’ve narrowed mine down to a set that fits my needs pretty well.
Let’s get into how to create our categories!
If you are like me, you’ll want to start with a clean slate. You can skip this step if you are apprehensive about deleting anything, and go watch an episode of Hoarders…maybe you have some electronic hoarding tendencies…just kidding. 🙂 There is no bulk way of going about this, so select a category, click the Delete button and confirm the deletion by pressing the OK button in the dialog box that pops up.
![]()
It’s ok, these can always be created again!
Once you have a clean slate, let’s get started creating our Categories to match our GTD contexts. To create a category, click the New… button, type a name for the category (I like to begin mine with the @ symbol, which keeps them at the top if I have other categories listed.
Next, select your favorite color (chartreuse, periwinkle, gray…). You also have the option of assigning a shortcut key from CTRL + F2 to CTRL+ F12. If you find this makes you more productive and you don’t like using the mouse if you don’t have to, then these shortcuts are for you. Click OK when you are done.
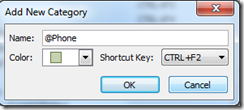
Alright, first category down. Repeat the steps above to create the rest of your categories. Remember these categories represent your Next Action contexts. You may already have context that you use, or you may be starting out for the first time. If you are starting out for the first time, my suggestion is to start simple. More contexts can always be included in your system as you refine it and fit it to your liking.
Get Your Next Actions Where You Can See Them
With this GTD implementation, Next Actions are created, reviewed, organized and completed in Outlook 2010. One of the key features that help us with these tasks was introduced back in Outlook 2007 and is called the Outlook To-Do bar. Folks, if you haven’t been introduced to the To-Do bar, then allow me. To-Do bar, folks, folks, this is To-Do bar.
As you can see to our right, the To-Do bar shows upcoming calendar appointments on top, and tasks arranged by categories beneath the appointments. Now, before you ask, I’m sure my To-Do bar looks a tad different than yours, or isn’t shown at all. That’s ok, because I’m going to show how to modify your layout to show the To-Do bar, and customize the To-Do bar to your liking.
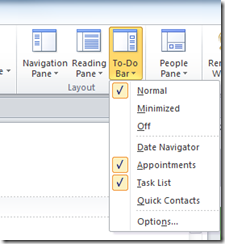
First, the To-Do bar isn’t any good if we can’t see it. So to get this bad-boy out in the limelight, let’s do the following. First, go to the ribbon up top (where all the fancy icons are) and choose the View tab. In the Layout section, select to To-Do bar drop-down button and make sure the Normal option is selected. Now we have our To-Do bar front and center…err…right.
Now, the default To-Do bar is a bit too busy for my tastes. It comes by default with a mini calendar called the Date Navigator which I don’t find all that useful personally. I like to simplify my interface, giving the most room for my appointments, or hard-landscape, and my Next Actions (categorized tasks). To customize what is displayed on the To-Do bar, head back to the View tab, click the To-Do bar drop-down menu and check or uncheck any of the following options:
- Date Navigator
- Appointments
- Task List
- Quick Contacts
Ok, now we have our To-Do bar customized, we have one last step to make sure it’s displaying correctly for our GTD system.
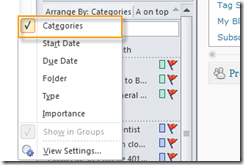
The To-Do bar may organize your tasks by start-date or due-date by default. This isn’t the best sorting option for our GTD system, so we’ll organize it by Categories. This breaks our Next Actions into the proper contexts we’ve assigned them. Our in strict Outlook speak, this sorts our To-Do items (tasks, flagged mail, etc.) by category.
To do so, click on the left column header in the To-Do bar and select the option for Categories. It’s magical.
Wrappin’ It Up
Ok, I’ve covered the basic setup for getting Outlook ready for Getting Things Done. I have a few more advanced setup tricks to cover and I will detail these when we get to processing our inbox in an upcoming post…aren’t you excited? Before I go, I want you to think for a moment about how you organize your mail.
We all in some way or another create a folder structure that works for us as individuals. This could be as simple as one folder for email we’ve read (some use the Trash) or as elaborate as complex nested groups of folders and sub-folders to organize and categorize our mail. When using Outlook with GTD, our folders are there for one thing. Keeping reference material. In many business environments, this could mean ALL mail is kept for compliance and audit trails, but it is still reference material (some day I may need this email…). I urge you to think about, or even rethink how you organize your email, and setup a system that works for you.
I’ve gone from a very complex system to a rather simple system, and this decision is primarily based on Outlook 2010 enhancements. The search and indexing features are phenomenal, so I find I don’t have to file email sent to me by a certain person, or about a certain subject. I can simply type in a word or two, maybe the sender’s name and what the email was about, and generally I can find the email I was looking for in a matter of seconds. A second feature, called search folders, allows me to setup pre-defined search criteria, and these folders are populated with email that meets the search criteria. Now I can dump the thousand emails for one project into a single project folder, and if I need to, use Search Folders to dynamically group mail as I see fit.
I’ll cover these features as we get into the processing and organizing posts, but for now, if you don’t have an organizational system for email, or you are thinking yours are too complex, keep in mind that simple is often better, and new features in Outlook only make it easier for you to file your email efficiently, and find it again quickly.
In the next post we’ll get OneNote setup for our system, so we can get busy and use our tools to actually DO stuff instead of reading ridiculously long-winded blog posts.
See you soon!
GTD with Outlook 2010 and OneNote 2010 – Overview
May 11, 2010
By Michael Wheatfill
Table of Contents: GTD with Outlook 2010 and OneNote 2010
Hey GTD’ers. There are several blogs out there that describe how to utilize Outlook and OneNote to implement the Getting Things Done methodology. The most popular of the bunch is a collection of posts over at 7Breaths that covers OneNote 2007 and briefs on it’s integration with Outlook 2007.
The release of Office 2010 brings quite a few neat features that can be used to make you more productive and organized if you currently use Outlook and OneNote or if you are just starting out with Getting Things Done.
This blog post will give a brief overview of my system, which pulls many ideas from the the 7Breaths implementation, and adds my own twists and ideas for making my system work for me.
I use Outlook 2010 and OneNote 2010 as the main tools for managing my GTD system. Since I spend most of my time at work on my computer, and the technologies I work with as an IT consultant are Microsoft centric, it makes sense for me to use an electronic GTD implementation with applications I’m familiar with and happen to love…isn’t that why we choose the GTD tools we do?
Keep in mind my system is not entirely electronic. I have physical inboxes, filing cabinets and notebooks at home, at work, and a portable system that fits in my laptop bag. Don’t forget one of the most important tools in any GTD system…the ubiquitous capture device. No technology here, just a small Moleskine reporter notebook I take with me everywhere.
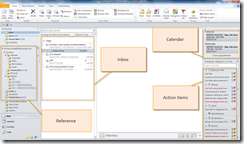
Outlook 2010
Outlook is my central hub for collecting and organizing emails, tracking my “hard landscape”, and managing my Next Actions. The screenshot below shows a brief overview of where I spend most of my time, in the Mail view. This gives me the ability to process my inbox, organize my inputs, view my upcoming appointments and get a snapshot of my Next Actions.
Outlook is essentially used for the following workflows in the my GTD system:
OneNote 2010
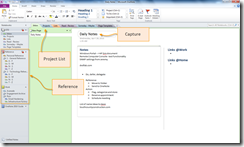
OneNote captures all of my thoughts and notes each day, keeps my projects, support material, Someday/Maybe lists, and provides a place to store all of my electronic reference material. Here’s a screenshot of my OneNote landscape.
OneNote plays the following roles in my GTD system:
- Collection – Collects random thoughts, links, anything I want to remember, meeting notes and brainstorming
- Processing – Everything I capture is scanned and reviewed for possible Next Actions, Projects, Someday/Maybe’s, reference, or perhaps is deemed trash. Being the environmentally conscious person that I am, this information goes straight to the Recycle Bin (yes, OneNote has a recycle bin)
Let’s not forget the Operating System – Windows 7
In any electronic GTD system, the OS definitely plays a role. Of all the information that I process and organize on a daily basis, not all of it can live in Outlook or OneNote (well, it’s possible it can, but just not practical). Some of this information comes in the form of documents, executables, pictures or video. I use the Windows 7 file system to organize this information as well.
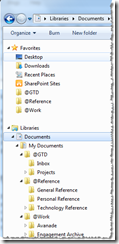
My goal was to make my file system reference as easy as possible, and something I didn’t have to relearn how to use when doing something outside of Outlook or OneNote. Windows 7 makes things simpler with the default profile folders, folder link favorites, Libraries and fast search functionality out of the box.
To make organization easy to use and understand, I basically mirrored my organizational approach from OneNote. As you can see from the screenshot below, the folder structure looks pretty similar to the OneNote screenshot above:
Now when I have support material and reference that needs to live outside of Outlook and OneNote, I can easily find it using a mirrored context as opposed to remembering where the corresponding folder lives in relation to my information in OneNote or Outlook.
What’s Next
My goal with this blog post is to give you a quick snapshot of what my system looks like. The intention was not to deep dive into the details of setup and functionality. Hang tight though! That is exactly what I plan on getting into in the upcoming Outlook 2010 and OneNote 2010 GTD series.
Thanks for reading and happy GTD’ing!
Enhance Productivity With OneNote 2007
May 29, 2009
Getting things done and takin’ notes…
I stumbled upon a blog the other day called 7Breaths with the tagline “Decide it. Do it.” This blog is focused on “Getting things done each day”, or just “Getting Things Done” (GTD for short). He started blogging about integrating GTD and OneNote back in 2007, which means I haven’t been “Getting things done” for a while now. Well, it’s time to start, and one of the things on my list is to blog more. Well, here it is!
For those of you who are unfamiliar with GTD, as I was, here’s a Wikipedia page you can read through. http://en.wikipedia.org/wiki/Getting_Things_Done.
The blog author named Rob, has a great workflow he designed where he uses OneNote 2007 and it’s tight integration with Outlook 2007 to “GTD”. He has detailed this workflow in several sequential blog postings which can be found here. The thing that excited me most about this is I use OneNote 2007 to track all my notes. Also, I would consider my approach to productivity sub-par, and I’m always looking for ideas to streamline how I “GTD”. Integrating technology and productivity couldn’t be more exciting for me!
In addition to OneNote 2007, Outlook 2007 is used to manage appointments and projects. Additional blog postings on the subject can be found here.
In closing, for those of you that need a productivity boost and are looking for a tool to help with that, check 7Breaths out. If you are already as productive as can be, but want to learn a few OneNote 2007 tricks, and you deem this a worthy way to spend your time, then check out 7Breaths!
Formatted text when pasting in OneNote 2007
May 28, 2009
Like many of you out there using OneNote 2007, I paste a lot of web snippets into my OneNote Notebooks. I myself like to have the same font size , type and color for all my notes that I’m taking. However, OneNote’s default option when pasting text is to match the source formatting of the copied text. This means that OneNote will try and match the font size, type and color of the website you are copying from. When pasting from a myriad of different websites, my notes tend to look more untidy than normal (my notes are always a tad messy).
One of the biggest gripes is the lack of the Format Painter toolbar button that is present in most other standard Microsoft Office apps.

The almost omnipresent Format Painter tool is non-existent in Microsoft OneNote 2007. 😦
In a nutshell, this handy little tool tool allows us to replicate the font and paragraph formatting of some source text that we target in the current document, and select the text we want to format identically to the source text.
Maybe this feature will arrive in Office 2010 (we’ll get a sneak peak when the Tech Preview becomes available), but for the time being, a lot of us resort to good ‘ol fashion text formatting.
For those of you that like to shave a bit of time off of your note taking, here’s a tip to help you corral your pasted text and have it behave like you want it to, by default!
Match Destination Formatting and Setting the Default Paste Behavior
When you paste your text into OneNote, observe the little icon, called the Paste Smart Tag, that appears in the lower left-hand corner of your pasted text. Click the icon, and in the drop down menu that appears, select Match Destination Formatting.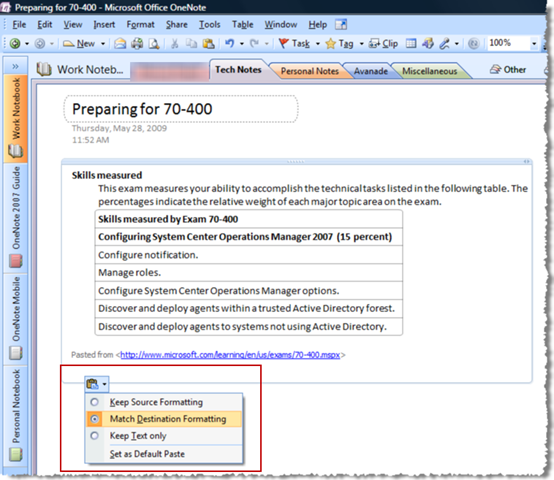
OK, you aren’t done quite yet. If you would like for OneNote 2007 to match the destination formatting every time you paste text from different sources, you can set it as the default, instead of clicking the Paste Smart Tag every time you paste!
All you have to do is click the Paste Smart Tag icon again and select Set as Default Paste. Now every time you paste text from different web pages or documents, it will match your original formatting you had set in OneNote.
Note: If you move on and start formatting the text, or typing additional text, the Paste Smart Tag will disappear. You’ll need to use the Smart Tag as soon as you paste your text if you want to manipulate these options.
Now, a few more things. By default, OneNote 2007 running on Vista will format your notes with 11pt Calibri. I happen to like the defaults, however, if you want to change your default font for note taking, you have the option to do so.
Changing the Default Font
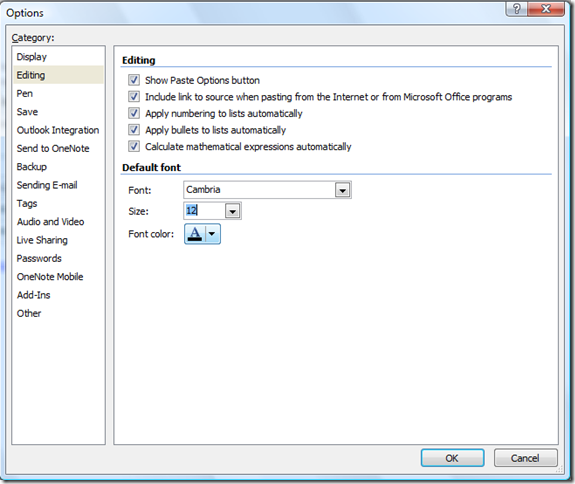
To change the default font, on the menu bar, select Tools –> Options. In the Options window, select the Editing category. You can now change the default font type, size and color for taking notes in OneNote. In the example below, I changed mine to another Windows Vista font, called Cambria, with the size of 12 pt. This is a serif type font, as opposed to the san-serif Calibri font.
Other Formatting Options
I understand not everyone reading this will like the Match Destination Formatting option. If you noticed on the Paste Smart Tag menu, there is one additional option called Keep Text Only. This option removes all formatting and uses the default font options. What do I mean by all formatting you ask? It removes bold, italics, font sizes, table formatting, etc. It just pastes a blog of unformatted text.
I actually use this feature quite often. And here’s why.
- Sometimes I don’t need or like the formatting of text that I’m pasting in. I’d rather throw it all away, and format the plain text if I need to do so.
- I can easily get rid of the of the “Pasted from” citation OneNote automatically adds to all information copied from the web or Office documents. Do you ever notice that at the bottom of text you paste? It looks something like this:

Now, don’t get me wrong. I LOVE this feature and it cuts out the task of including a link to the text I’m citing. However, I don’t use it all the time, and I can easily get rid of it using Keep Text Only in the Paste Smart Tag options, as opposed to selecting the “Pasted from” reference and deleting it every time I copy information into OneNote.
Enjoy your note taking with OneNote!
